There’s something about a handmade gift that feels extra special. When you add a personal touch, such as a name or a simple symbol, it becomes unforgettable. That’s where a branding iron comes in, turning everyday items into something deeply personal. If you’ve never used one before, don’t worry! It’s easier than it looks, and once you get the hang of it, you’ll find all kinds of things to brand.
Know What a Branding Iron Can Do
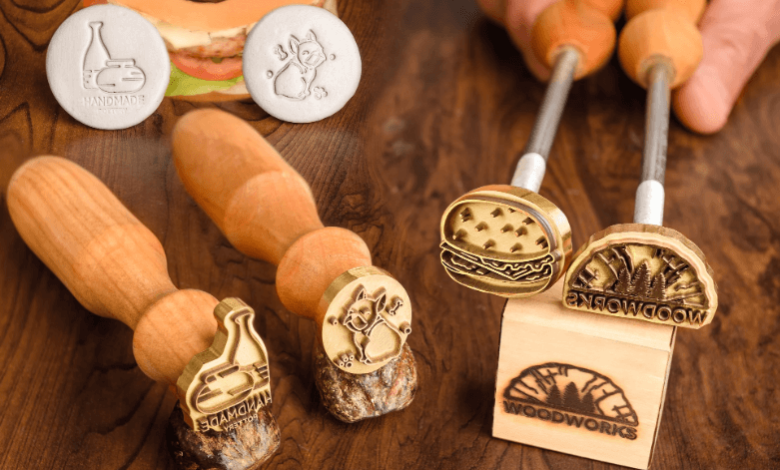
A branding iron isn’t just for cowboys or woodworkers anymore. It can be a great tool to have at home when you want to create personalized gifts. For example, you can press your initials onto a wooden cutting board, a leather notebook cover, or even a cork coaster. This leaves a permanent mark that adds a special story to your gift.
Additionally, branding irons come in different styles. Some have removable letters, so you can change the message when you want. Others come custom-made with your name, logo, or a symbol you like. While electric versions make things easier because they heat up quickly with just a plug.
See also: Corporate Contact 7084599265 Business Customer Hotline
Pick the Right Material to Brand
Before heating anything up, think about the item you want to personalize. Not all surfaces work well. Some might burn too fast, while others won’t hold the mark at all.
Here are the best choices:
- Wood: Especially unfinished or soft wood. Perfect for cutting boards, boxes, or signs.
- Leather: Great for wallets, keychains, and journal covers. Just avoid synthetic leather, as it can melt instead of burn.
- Cork: Lightweight and easy to brand. Think coasters or cork boards.
- Cardboard: Works for packaging or gift tags, but only with light pressure and a quick touch.
Set Up Your Work Area First
This step matters more than people think. Branding is quick, but the heat and pressure can damage surfaces if you’re not prepared. So, before you even plug in the iron, take a few minutes to get your workspace ready.
Things to lay out:
- A flat, stable surface (not your kitchen table)
- A heat-resistant pad or tile under your item
- Safety gloves (especially if your branding iron doesn’t have a long handle)
- Scrap material for testing
- A steady hand, and maybe a ruler or guide for perfect placement
Heat and Timing Matter More Than You Think
Once your branding iron is on, it needs time to get hot enough. But too much heat can scorch your material. So there’s a sweet spot, and it depends on the type of iron and the item you’re branding.
Here’s what to watch for:
- Electric irons usually take 5-10 minutes. You’ll see a faint wisp of smoke when it’s ready.
- Torch-heated irons (like propane versions) require a little finesse. Heat it evenly and avoid overheating one side.
- Test timing on scrap by holding the iron for 1-2 seconds first. If it’s too light, try 3 seconds. If it burns too dark, reduce the time.
Take your time and don’t rush the first few. Once you get the hang of it, your timing will become second nature.
Make Your Mark, Literally!
Now comes the fun part. Position the iron exactly where you want your mark. Hold it steady, apply firm pressure, and count in your head.
- Don’t wiggle or shift the iron.
- A clean press looks better than one that’s too dark or uneven.
- Once you’re done, lift the iron straight up. Be careful not to drag.
Let it cool fully before handling the branded part. That keeps the mark crisp and avoids smudging the edges.
Get Creative with What You Brand
You don’t need a big workshop or expensive materials to make something special. Once you’ve got the hang of using your branding iron, it’s fun to experiment with everyday items around the house.
Try it on:
- Wooden spoons for holiday baskets
- Personalized bookmarks for your book-loving friend
- Custom tags for your handmade products
- Wood ornaments for birthdays or Christmas
- Leather luggage tags for travelers
Remember, you don’t always need a fancy logo. Sometimes, a single letter, heart, or symbol says enough.
A Few Safety Reminders That Go a Long Way
Branding at home is safe if you take basic precautions. But because you’re working with heat, it’s smart to have a safety checklist.
- Keep a metal tray or tile nearby to rest the iron
- Unplug right after use, and let it cool fully
- Never leave it unattended when plugged in
- Keep kids and pets far from the workspace
Conclusion
A little planning, some imagination, and a warm branding iron are all you need to turn simple items into something meaningful. Every mark you press adds a quiet message that says, “This is just for you.” So if you’ve got a few items sitting around and a gift idea in mind, now’s a good time to heat up the iron and give it your personal touch!
Visit Short Order Products to purchase your own branding iron today.