Table of Contents
- Benefits of Tub-to-Shower Conversion
- Design and Functionality Considerations
- Step-by-Step Guide to Conversion
- Cost-Effective Techniques and Materials
- Frequently Asked Questions
Key Takeaways
- Understanding the benefits of converting from a tub to a shower.
- Essential design and functionality considerations.
- A step-by-step guide to a successful tub-to-shower conversion.
- Cost-effective techniques and materials.
- Frequently asked questions about the conversion process.
Benefits of Tub-to-Shower Conversion
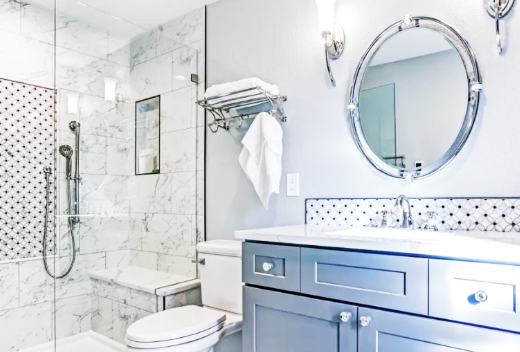
Converting a bathtub into a shower offers numerous benefits, from enhanced functionality to modern aesthetics. This transformation can dramatically improve accessibility, especially for seniors and individuals with mobility issues. A shower allows for easier entry and exit than a deep bathtub, reducing the risk of slips and falls. Additionally, tub to shower conversions typically use less water compared to baths, contributing to water conservation efforts and potentially lowering your water bills.
Moreover, transforming your bathroom can increase your home’s resale value by providing a contemporary look and feel. Potential buyers often view a stylish, updated bathroom as a significant selling point. A new shower can make a small bathroom appear more extensive and more open, enhancing the overall appeal of your home.
Design and Functionality Considerations
When planning a tub-to-shower conversion, consider your space and how you want to utilize it. The layout of your bathroom will significantly influence the design options available to you. Choose stylish and durable materials like tile, stone, or acrylic. Each material has pros and cons, so consider factors like maintenance, cost, and longevity. Tiles offer endless design possibilities, while acrylic panels are easy to clean and install.
Consider elements such as lighting and ventilation, as they can significantly impact the usability and comfort of your new shower. Adequate lighting can make the shower area feel more spacious and inviting. Ventilation is crucial in preventing moisture build-up and mold growth. Considerstalling a humidity-sensing fan to help manage air quality automatically.
Accessibility is another critical aspect to consider. Features like grab bars, built-in seating, and non-slip flooring can make the shower safer and more convenient for everyone. Designing an open or curbless shower can further enhance accessibility, creating a spa-like experience in your bathroom.
Step-by-Step Guide to Conversion
- Assessment and Planning: The first step is to evaluate your current bathroom layout and determine if it can accommodate a shower. Take accurate measurements and consider potential obstacles, such as windows, plumbing, and electrical outlets. Gather design ideas and materials that suit your style and budget. Consult with a professional if you need clarification on the technical aspects. Proper planning can save time and prevent costly mistakes down the line.
- Preparation: Begin by removing the existing bathtub and prepping the area for the new shower. This stage may involve some demolition work and adjustments to the plumbing. Ensure that water supply lines and drainage are appropriately configured for the new shower setup. Removing tiles and old fixtures can be messy, so proper preparation, including covering nearby areas and wearing safety gear, is essential. Ensuring a clean and well-prepared space is crucial for a smooth installation process.
- Installation: Next, install the new shower base, walls, and fixtures. Make sure that all elements are securely fitted and waterproofed. Pay attention to details such as the alignment of tiles and the placement of shelves or seating. If you’re using a prefabricated shower kit, follow the manufacturer’s instructions closely. Proper installation will ensure durability and functionality, preventing leaks and water damage.
- Finishing Touches: Add features like built-in shelving, seating, or decorative tiles. Complete the installation with caulking and sealing to prevent leaks. The finishing touches can significantly enhance your new shower’s overall look and functionality. Add accessories like a rainfall showerhead, glass doors, or custom lighting to elevate the design. These small details can make a big difference in the final appearance and ease of use.
Cost-Effective Techniques and Materials
Renovating a bathroom can be expensive, but there are ways to manage costs effectively. Opting for materials like acrylic or fiberglass shower kits can be a budget-friendly choice. These materials are cost-effective and easy to install, reducing labor costs. Acrylic panels, for instance, replicate the appearance of tiles but without grout lines, making them easier to clean and maintain.
Reusing existing plumbing and fixtures can also cut down on expenses. If the current plumbing setup is compatible with the new shower design, you can minimize alterations, which can be costly. For more budget-friendly renovation ideas, consider this guide to budget-friendly bathroom remodel ideas, which offers practical tips to keep your project within budget without compromising quality. Simple updates like replacing the showerhead or applying a fresh coat of paint can have a significant impact without overspending.
Read more: Importance of Client Retention in an Accounting Firm Acquisition
Frequently Asked Questions
How long does a tub-to-shower conversion take?
The standard conversion process usually takes 2-4 days, depending on the project’s scope. This includes time for demolition, plumbing adjustments, and installation of new materials and fixtures. More complex renovations that involve structural changes or custom designs may take longer. Always factor in some extra time for unexpected issues during the renovation process.
Do I need a permit for a tub-to-shower conversion?
You should check with your local building authority to determine if a permit is needed, as requirements differ depending on the location. To meet local building codes, official approval is necessary for any major plumbing or structural elements changes. Having the correct permits can prevent legal problems and guarantee that the project is inspected for safety and quality. Seek guidance from an experienced contractor for smooth navigation through the permit process.
Can I do the conversion myself, or should I hire a professional?
While DIY tub-to-shower conversion kits are available and can be a good option for those with some renovation experience, hiring a professional is often best. An experienced contractor can guarantee the work is completed accurately and securely, avoiding possible issues such as leaks, inadequate drainage, or structural problems in the future. Although the upfront expense for professional installation may be more significant, choosing this option can result in long-term savings and fewer future complications. If you decide to tackle the task independently, thoroughly study the process and prepare all necessary tools and materials.